
There is a Jig for cutting down Aluminum Frames
This is a combination How-To and Review of the solution to a tricky problem. Over the years I have occasionally run into the issue of not having the right size aluminum frame for an image. All I would have to do is cut down existing frame lengths to accomplish this, BUT:
a) Aluminum frames are expensive and slow to get. The only way to get the price down is to order them on line in enough quantity to get free shipping. But even that isn't enough. So one has to wait for a good 15 to 20% off sale – which comes along once or twice a year, and stock up. A 16X20 frame – in my style of choice Nielsen N93-50 – lists on line for $32.76 not cocunting shipping. If all you want is one frame, this can be close to 50 bucks. By buying in bulk, at the right time of the year, I can get that down to about $28 with free shipping.
b) Cutting lengths with a power saw requires a good saw, a carbide tooth blade, some skill and a little daring-do. I say that because I used to do it that way – until the blade kicked out a cut piece of frame, it bounced off the cinderblock wall, penetrated a can of WD-40 and sent it careening around the basement. That could have been my head – I never went there again.
c) If you Google the problem, one finds all kinds of advice, none of it good.
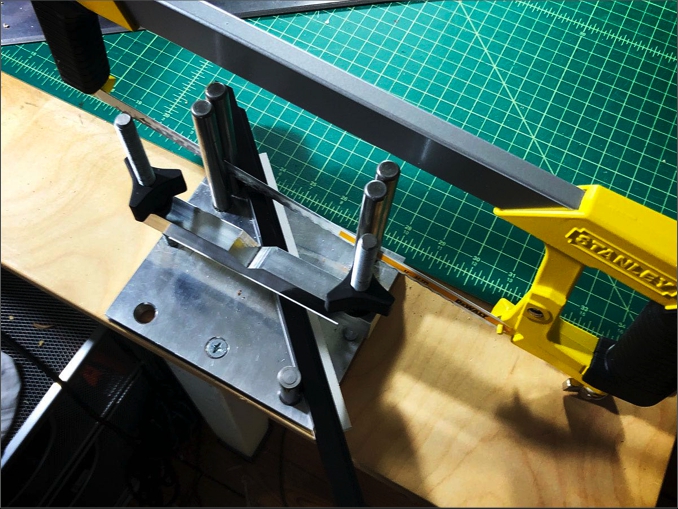
So I recently decided that I wasn't going to give up without a fight – and eventually after many searches came up with an outfit that sells the jig pictured here. They designed it themselvea and sell it to anyone who will plunk down 60 bucks – easily paying for itself with the first couple of frame cut-downs.
What I found: Model 534 Hacksaw Mitre Box - $60.00 plus $13.45 shipping for US
http://www.waynegoldmanengineering.com/Model-534-Mitre.html
My Set-Up:
1– Unmounted the jug from the wood blocks (designed for clamping the jig into a vise) and mounted it to my work table in my studio – on top of abut 1/2 inch 5x6 panel to give me room for the hack saw handle. This means taking it down when not in use so I can use the table for other things, but, again, the need only crops up occasionally.
2– Used double-sticky tape to place a thin strip of rag board on the bottom of the clamp. This to prevent any scratching or denting of aluminum frames. I was surprised to find that the the stainless steel guide posts don't leave any marks on the flat outside edge of the frame.
3– I also cut a strip of rag mat to place under the frame bottom for a little extra give at the bottom of the cut.
4– I immediately realized that while there was a groove in the jig pictured that would allow one to finish the cut, mine had no such groove. Then again, the base is a thick slab of aluminum, so the saw blade should make its own groove over time. If I decide I don't like this, I can always cut a square of masonite and drill the appropriate holes to make it work there.
5– Per guidelines I purchased a good hack saw and quality 32tpi blades.
6– My test cut was on a scratched length of frame that I had lying around. The intro image is my set-up with a length of frame in position.
7– Cut takes about one minute with a good blade and is almost burr free – a perfect fit. A little patience and a softer touch might take two minutes. Measuring for the cut isn't all that difficult.
8– I have a mini hand-held vac thingie for the studio that takes care of any aluminum dust.
9– If I have any concern it's that the two mounting bolts might not be stable enough – even with my mounting wing- nuts very tight I got a little shifting of the jig that compromised the smoothness of my cutting stroke (did not effect the cut). I'll be adding a C-clamp top/left where a third bolt would have helped.
Measuring is easily done: while positioning the frame strip, use a tape measure from the base corner of the jig to the end. I determined that for me – subtract 6” and then fine tune it by making the final measurement 1/8” longer than that result.