Photographing Art w/Flash – even behind glass
I designed this set-up after spotting, in a magazine article about an art museum exhibit being mounted, a wheeled rig in the background that was obviously being used to photograph the work. I realized immediately that it offered a solution to some of my art photographing problems and, though I couldn't see the complete system, I was able to fill in the gaps and come up with a workable system.
Advantages: sharp images, excellent color duplication, no glare or reflections from glass, quick and easy, a large number can be done in one session, high resolution camera can be used, no need to work in darkness because some amount of ambient light will not effect the results,
Cautions: deep frames should be removed – flash coming in at an angle leaves shadows around the sides. Paintings with gloss varnish will leave a myriad of hot spots. Paintings with extremely thick paint with peaks will leave tiny deep shadows; two things that help some here are a polarizing filter (usually not needed) and shooting RAW – but I've never been happy with the results.
THE SET-UP
1 – A Picture is worth a whole bunch of words: this set-up can easily be duplicated. In a spare room upstairs I have a rod running across the center of the room from which to hang the black curtains and a shelf-rack mounted flat against a wall on which to hang the art. Below is my mobile set-up. In this case it's in my wife's painting studio:
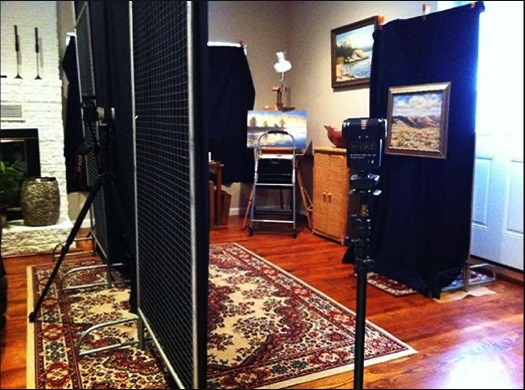
2 – Venue: as you can see, this can be set up almost anywhere. This room has one huge window at the far end that I somewhat blacked out. The window in the door behind the art, even though it was broad daylight, was not an issue. One can work in enough light to see what one is doing – just turn off overhead lights while shooting.
3 – Mounting the Art: artwork should be mounted over a black background. For this I use a single display rack. That way drape hooks can be used to hang the work. Height of the art work is measured by placing the center of the work at the precise height of the center of the camera lens – easily measured. I place a small piece of masking tape at that point (centered in both directions) on the backdrop. Then i used a couple of pieces of stacked foam core wedged behind the bottom corners to hold the work perfectly flat, since it inevitably hands out a tad at the top.
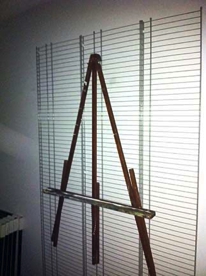
For shooting mounted and/or matted work I hang an inexpensive easel attached to the rack for propping the art flat – this can require moving the easel up and down some. Unmounted work can be pinned on a flat board propped on the easel – pictured below in my permanent set-up upstairs. Mounted work can be kept vertical by placing a flat board on the easel and holding the art work up with overlapping edges of push-pins:
4 – The Curtain: is what eliminates glare, reflections and hot spots. I use a total of three pieces of black cloth about six feet in height and 48" wide (one is behind the art). This way the two curtains in front of the camera can overlap and be clipped together allowing a tight hole around the lens. You can just see a couple of the clamps holding the curtains in place. The two racks in front of the camera in the mobile set-up sport short rack extenders that allow a bar to be run between them.
5 – The Flash: not near as demanding as one might believe. I use two ancient Vivitar 283 flash units set at an angle of 38 to 40 degrees from the art. Height is at the established camera and art level. Distance adjusted according to room available and some test shots. Otherwise here is where it gets a tad complicated:
a) Set flashes on full manual.
c) I used to use a cord running from my camera to the first flash – but that seemed to make for a lot of missfires. Now I use a Cactus Transceiver model V5 Duo under the fitst flash set on receive and one on the camera set on send. Never a missfire since. They're not very expensive either.
d) If there isn't room enough to pull the flashes back far enough, I have sheets of white cloth I rubber band over the fronts of the flash units to tone down the power.
e) Flashes are mounted on rather inexpensive, adjustable lighting stands.
6 – The tripod: obvious, but I need to make a special note here. High resolution digital cameras pick up on vibration easily. And modern tripods are pretty light. I've run tests and can verify that holding the camera steady on the tripod while shooting is preferable to stepping away and using a cable-release or remote. Of course you can invest in a heavier tripod and rail system for locking things down, but I find that unnecessary.
7 – The Camera and Lens: naturally my camera of choice for this changes with time. Right now I am using a Fuji X-T2. It's 24 megapixels and gets superb results. A quality 16x20 result is relatively easy – 18x24 with interpolating at a harmless level.
Distance from art to camera: I find approximately 5-5.5' to be best.
I use my Fuji 55-200 zoom for this (that's 84 to 305 equivalent). That gets me close enough to fill the frame with smaller works and still be able to cover most larger works. For huge works I simply switch to the 18-55 normal lens.
Full manual exposure and manual focusing (I have a small spotlight I can turn on for focusing only).
Aperture settings can vary according to need. Artwork is flat so anywhere over 5.6 should be fine – I usually end up on 16.
Shutter speed will be flash-sync speed with mechanical shutter – usually 1/125 or 1/250 second.
ISO can be anywhere from 100 to about 400, again depending on what is needed after exposure tests – 200 is my average.
Framing… careful framing saves a lot of work later. Zoom until two sides of the image are right up against the edges of the viewfinder (I have a 100% viewer so I've had good results actually cropping out the mat on two sides right there in the camera). Sometimes you will find that the art isn't hung perfectly straight or the whole piece isn't as flat to the view as needed. These are easy corrections to make. The result should be a file that only has to be cropped on two sides – and only very slightly or not at all on the other two.