
Home Made Mat Cutting System
Inexpensive, easy, convenient – There are a couple of reasons to go this route: money – good mat cutters are expensive, especially if you don’t really need to use one all that often; and simplicity – my reason. I have never appreciated the fine craft and utility of an expensive mat cutter. I prefer the direct, simple, accurate, cut -from-the-front approach. And I’m not alone; cruising artists’ studios in Maine I ran across a fellow curmudgeon who showed me his similar set-up. Nothing to do with cutting mats is all that simple. But once you get your mind around this one, and its quirks, you just might be a convert. I had a fancy cutter, and eventually gave it away rather than let it sit unused.
Construction…
Construction is downright easy. A partial sheet of hardwood plywood will serve to cut everything out of. The base of the cutter is 18x35 inches (I lightly sand edges as I go along). If stuck without a table saw, the cuts are so easy and basic, that it shouldn’t be a problem to find someone to do them for you. Might cost you a pizza – that’s what I charge.
I cut two strips of the same material 12 3/4 inches by 1 7/16 (there’s a reason for this) and a smaller piece 1 1/2 by 5/8 inches.
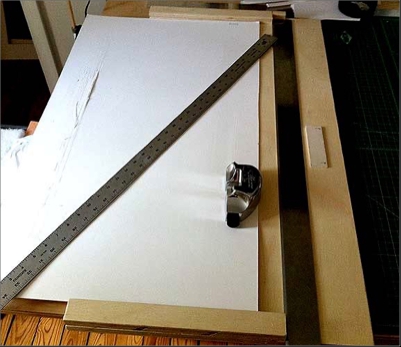
I simply glued one strip along the top edge of the cutter base, aligned to the left, and clamped it for drying. The small piece I glued along the top edge as a guide stop (as seen in the image) and clamped.
When this dried I laid the straight edge against the guide, placing a right angle against the far edge and the guide, clamping the guide in place. Then I moved the right angle down to the bottom for positioning the bottom end piece, glueing and clamping.
In the process I double checked and made sure my distance between the ends was about 32 1/8 inches. This way I can cut “almost” any matt I want.
For super large mats (and I actually have a couple of images calling for these) I simply go through the torture of clamping one end of my guide to the table and being extremely careful how I apply my pressures.
Your Tools…
• Dexter Mat Cutter – I’m sure other brands will work fine. Just be sure to make appropriate adjustments to your guide shim. set the blade depth just beyond the mat thickness, cutting very slightly into the under-buffer. Blades are available at Dick Blick or any number of places. Note: blade dull quickly when cutting rag.
• Guide Shim – Cutter blades are recessed slightly from the edge. Your shim allows you to make precise cuts. An issue with Dexter Cutters is that the profile has changed slightly, if not immediately detectable, over the years. The blade inset has become almost half that of earlier models – requiring a much narrower “shim.” For the latest model, a shim of exactly 1/8 of an inch does fine. My older model was just off 1/4 inch. The pictured shim is a 4.5x1.25 inch piece of mat (I double- stickied two thin pieces together for stiffness). The two arrows indicate the edge I like to use – where I took a pencil side and rounded it in slightly for the way I like to view my light pencil marks.
• a light, sharp, easily erased pencil – always use a light touch
• an eraser that does not leave smudges – an artist’s eraser from an art store is best
• a good, accurate yardstick – not difficult, but surprisingly you can find ones that aren’t, usually in the accuracy of the starting cut (or placement of the scale). One of my favorite ways to point out discrepancies in supposedly accurate tools for measuring is to take someone to a hardware store, into the area where you find various yardsticks and metal right- angles. They come in all sizes, some of them pretty expensive. Pick up a selection, hold them together and lay one edge down on a counter or table. Then, when you see the slight differences, ask yourself which one is accurate – and why the devil the rest aren’t.
• a good cutting edge, preferably with a cork backing (easily applied if lacking) and thick enough to prevent a razor knife from jumping up and onto a finger. NOTE: the cutting guide in the picture has a beveled edge – I do NOT use that for cutting, for a couple of reasons. It is not as reliable and stable for guiding the Dexter cutter, and can allow a razor knife to jump the track and hack a finger. I use the flat edge for both operations – as well as occasional glass cutting.
• a nice razor knife.
• a layer of mat or rag between the mat and the board surface
Cutting Mats…
• Outside measurements: while one can, I don’t like to use the cutter for outside measurements of my mats. I find it easier to simply measure and cut directly on my table top – covered with self-healing pads (see posting on making a studio work table.
• Determine your measurements. Some people cut as much as a quarter in from each edge. I prefer an eight of an inch. Either way: measure your work, subtract that measurement from your mat measurement, cut the result in half. That measurement plus your eighth of an inch will be your measurement in from the edge for your marks.
• Using your yardstick, lightly mark corners to be cut with very small, light angle-marks in pencil. I estimate one direction, place four small marks for guides going the other direction. Then I can measure in the other direction, placing my four corners, gently erasing the original four marks. Caution: mat outside dimensions can be slightly off – do not flip and measure opposite sides separately. Lay our your yardstick and measure in from the two sides.
• Place the mat in the cutter, lining up and placing the cutter into the near corner. Then use the shim to align the far corner, making sure to avoid shift at either end. Voila – make your cut with a sure, steady movement. Repeat for each edge. If your blade was placed accurately, erasures will be almost negligible.